> ## Documentation Index
> Fetch the complete documentation index at: https://docs.labelbox.com/llms.txt
> Use this file to discover all available pages before exploring further.
# Labeling editors
> A summary of labeling editor controls, enhancements, and supported annotations.
Labelbox automatically adjusts the editor interface based on the asset type selected for the project. However, there are some global editor settings and enhancements shared across all of the editor interfaces. These global editor settings are designed to provide an optimal labeling experience for your team through increased customization and quick accessibility.
Additionally, there are some data enrichment capabilities and supplementary tools available for use in the editor only with certain data modalities. Features such as attachments, instructions, and the data row information panel are available in the editor regardless of the type of asset being labeled.
## Attachments
Attachments can be used to provide supplementary content to any asset to help provide additional context for the labeling team. An attachment applies to an individual asset and may comprise an image, video, text, or HTML content. Markdown rendering is supported for attachments, allowing you to use to format text, add links, and include images within attachments. Multiple attachments can be linked to an singular data row.
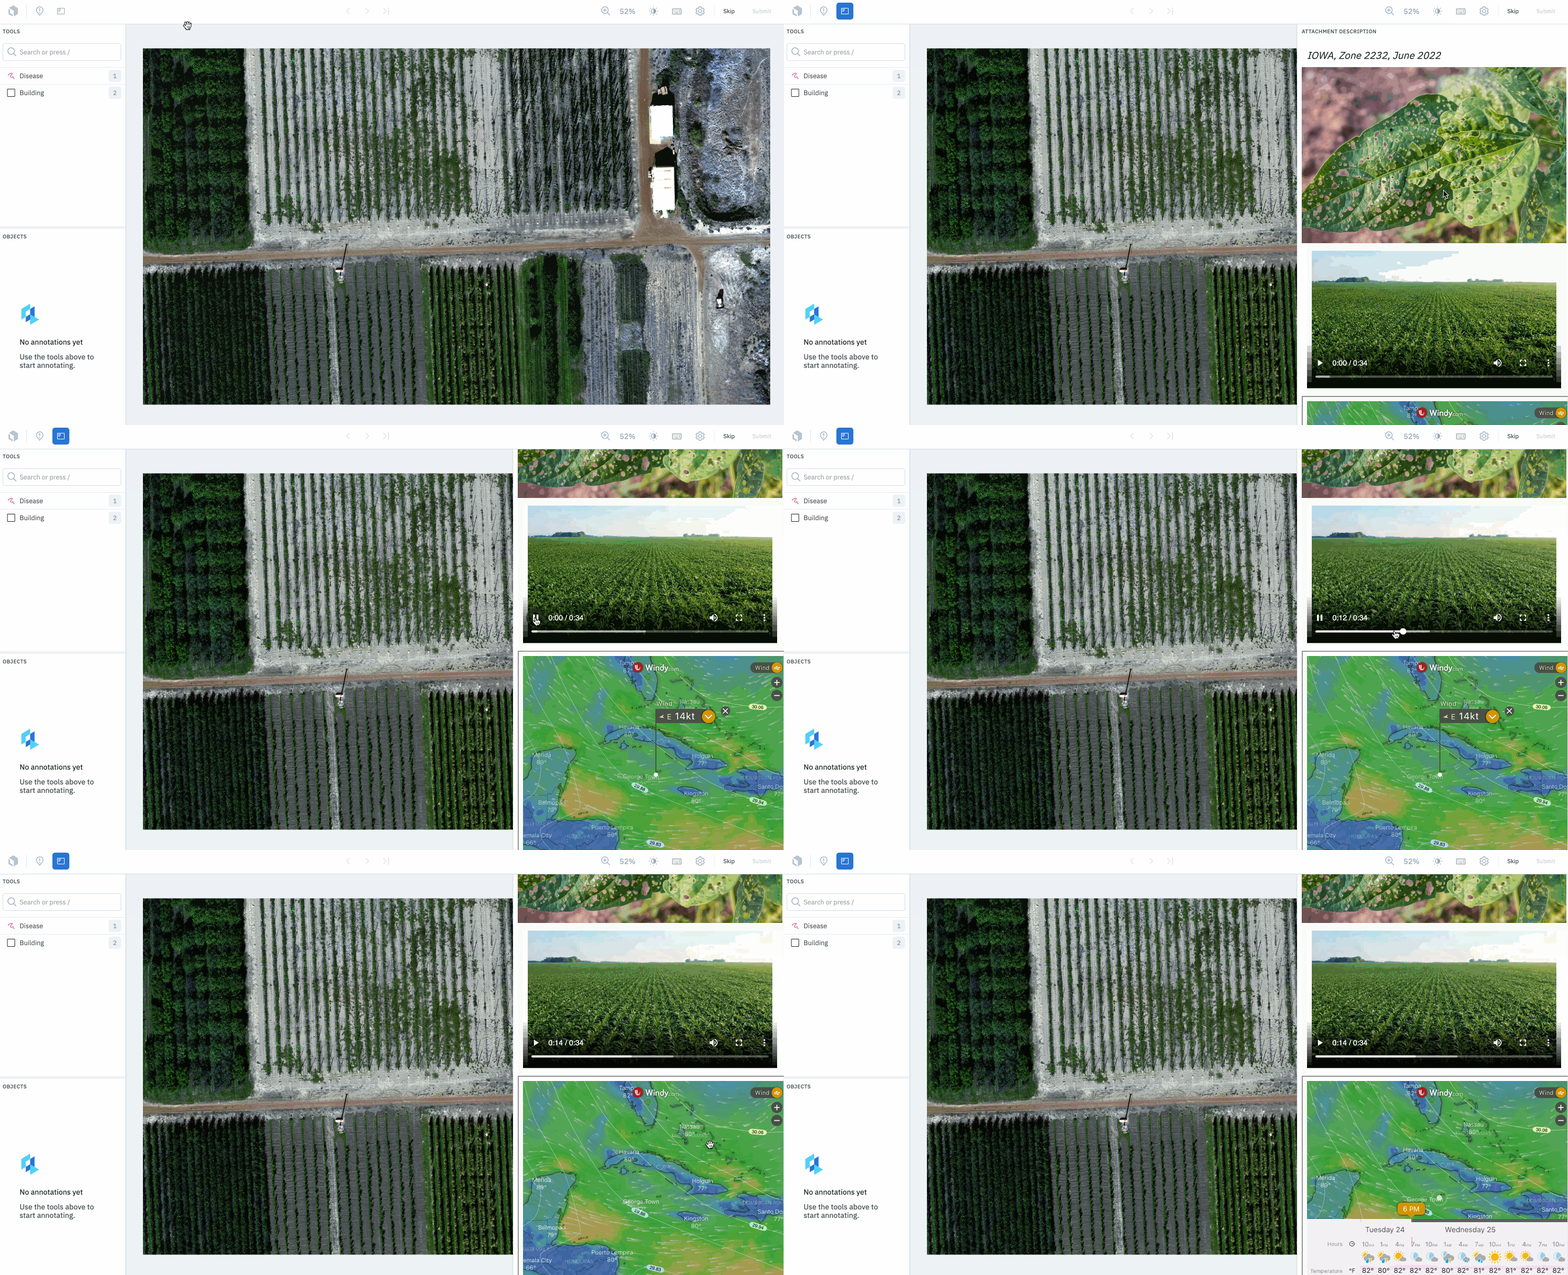 For details on how to create attachments or import data rows with attachments using the Python SDK, see the [Attachments developer guide](/reference/attachments).
When any attachments have been provided for an asset, labelers will see the **Attachment** button appear in the top left of the editor.
You can also use the hotkey `Shift` + `?` to open the attachments panel.
## Data row information panel
Access to additional context and information at the data row level can be extremely helpful to labelers as they label data. Users can click to view a side panel that brings up data row information, providing teams with ample context and easy access to information related to the particular data row being served.
For details on how to create attachments or import data rows with attachments using the Python SDK, see the [Attachments developer guide](/reference/attachments).
When any attachments have been provided for an asset, labelers will see the **Attachment** button appear in the top left of the editor.
You can also use the hotkey `Shift` + `?` to open the attachments panel.
## Data row information panel
Access to additional context and information at the data row level can be extremely helpful to labelers as they label data. Users can click to view a side panel that brings up data row information, providing teams with ample context and easy access to information related to the particular data row being served.
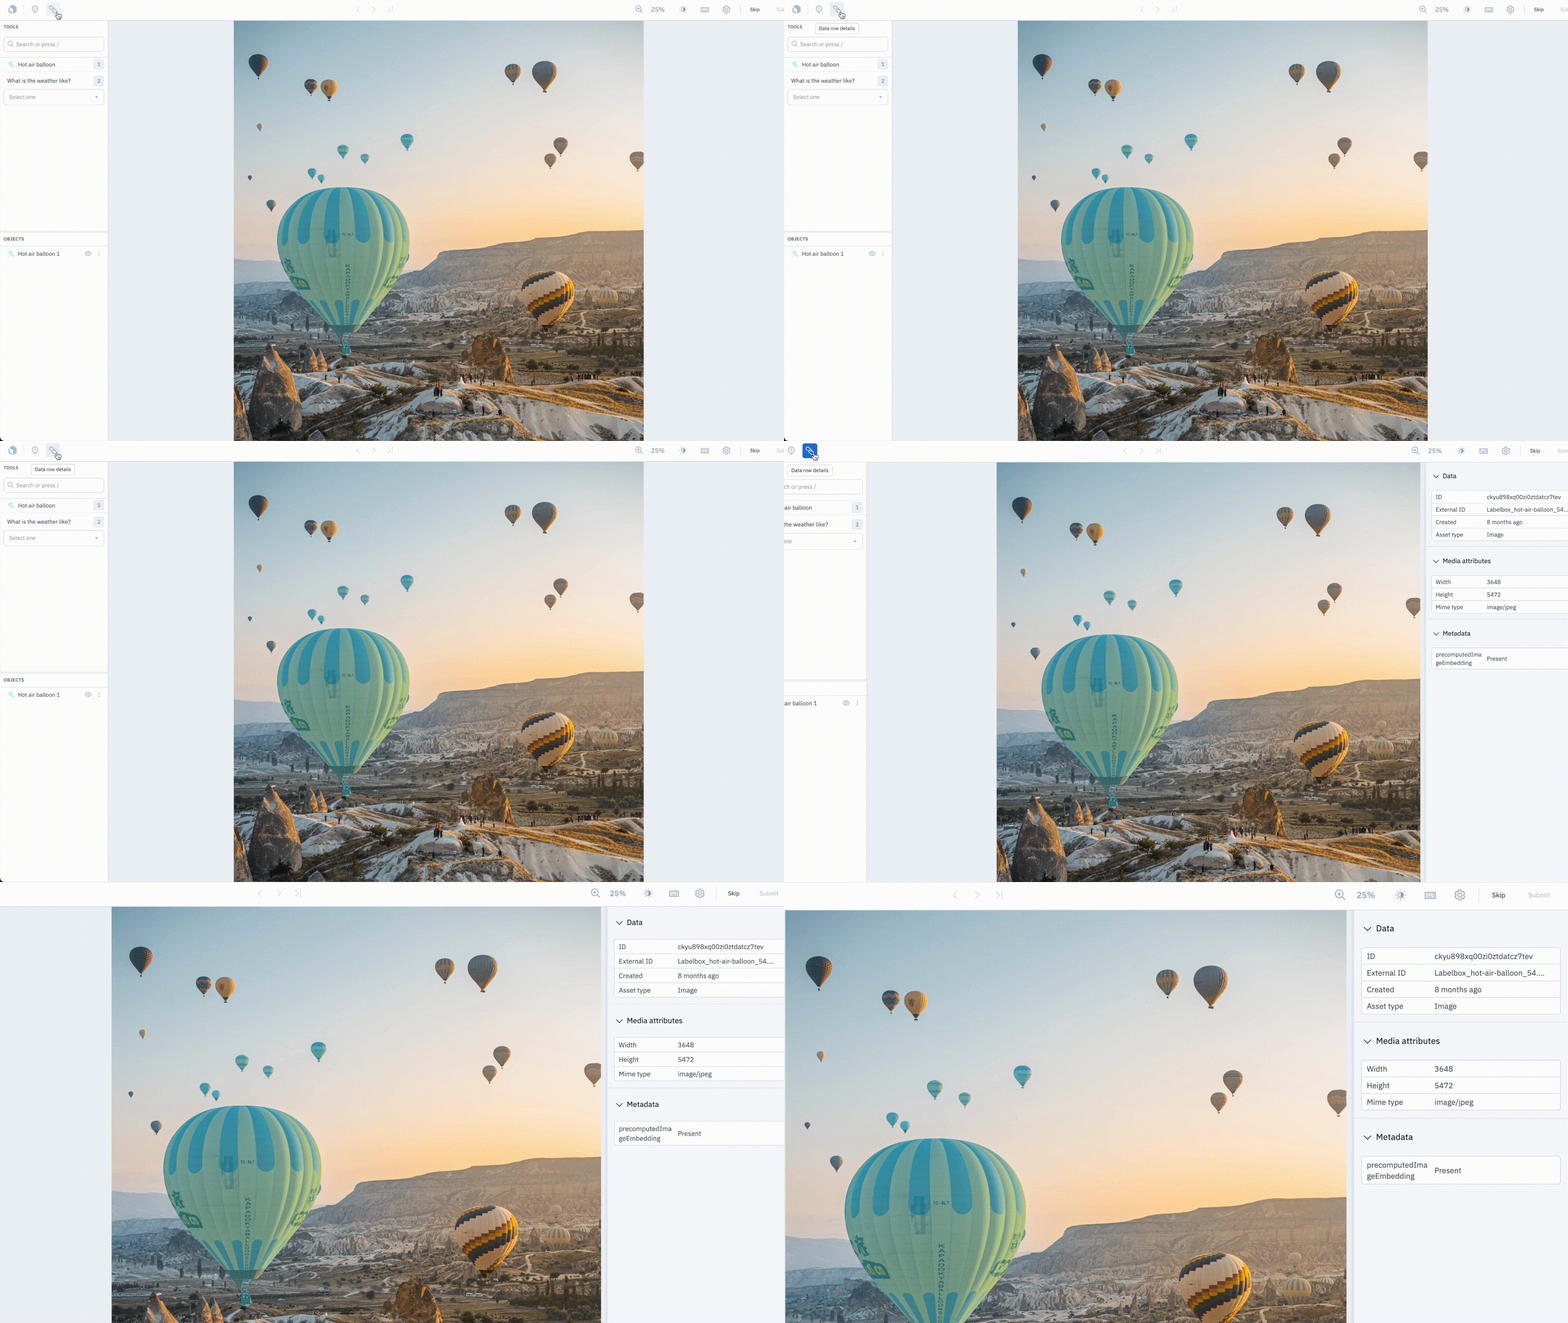 Labelers can view information such as the global key, the dataset, and when the data row was created. Based on data type, labelers can also view specific media attributes, such as an image’s width and height, the number of pages in a PDF document, the frame rate and duration of a video, and more. Additionally, labelers can also see any metadata attached to the data row.
## Image overlay
Image overlay can be used to provide labelers with additional view options for the image being labeled. For example, if you have additional cameras capturing images of your subject matter in different formats (greyscale, thermal, etc.), you may want to provide these images as contextual layers to the primary image.
Labelers can view information such as the global key, the dataset, and when the data row was created. Based on data type, labelers can also view specific media attributes, such as an image’s width and height, the number of pages in a PDF document, the frame rate and duration of a video, and more. Additionally, labelers can also see any metadata attached to the data row.
## Image overlay
Image overlay can be used to provide labelers with additional view options for the image being labeled. For example, if you have additional cameras capturing images of your subject matter in different formats (greyscale, thermal, etc.), you may want to provide these images as contextual layers to the primary image.
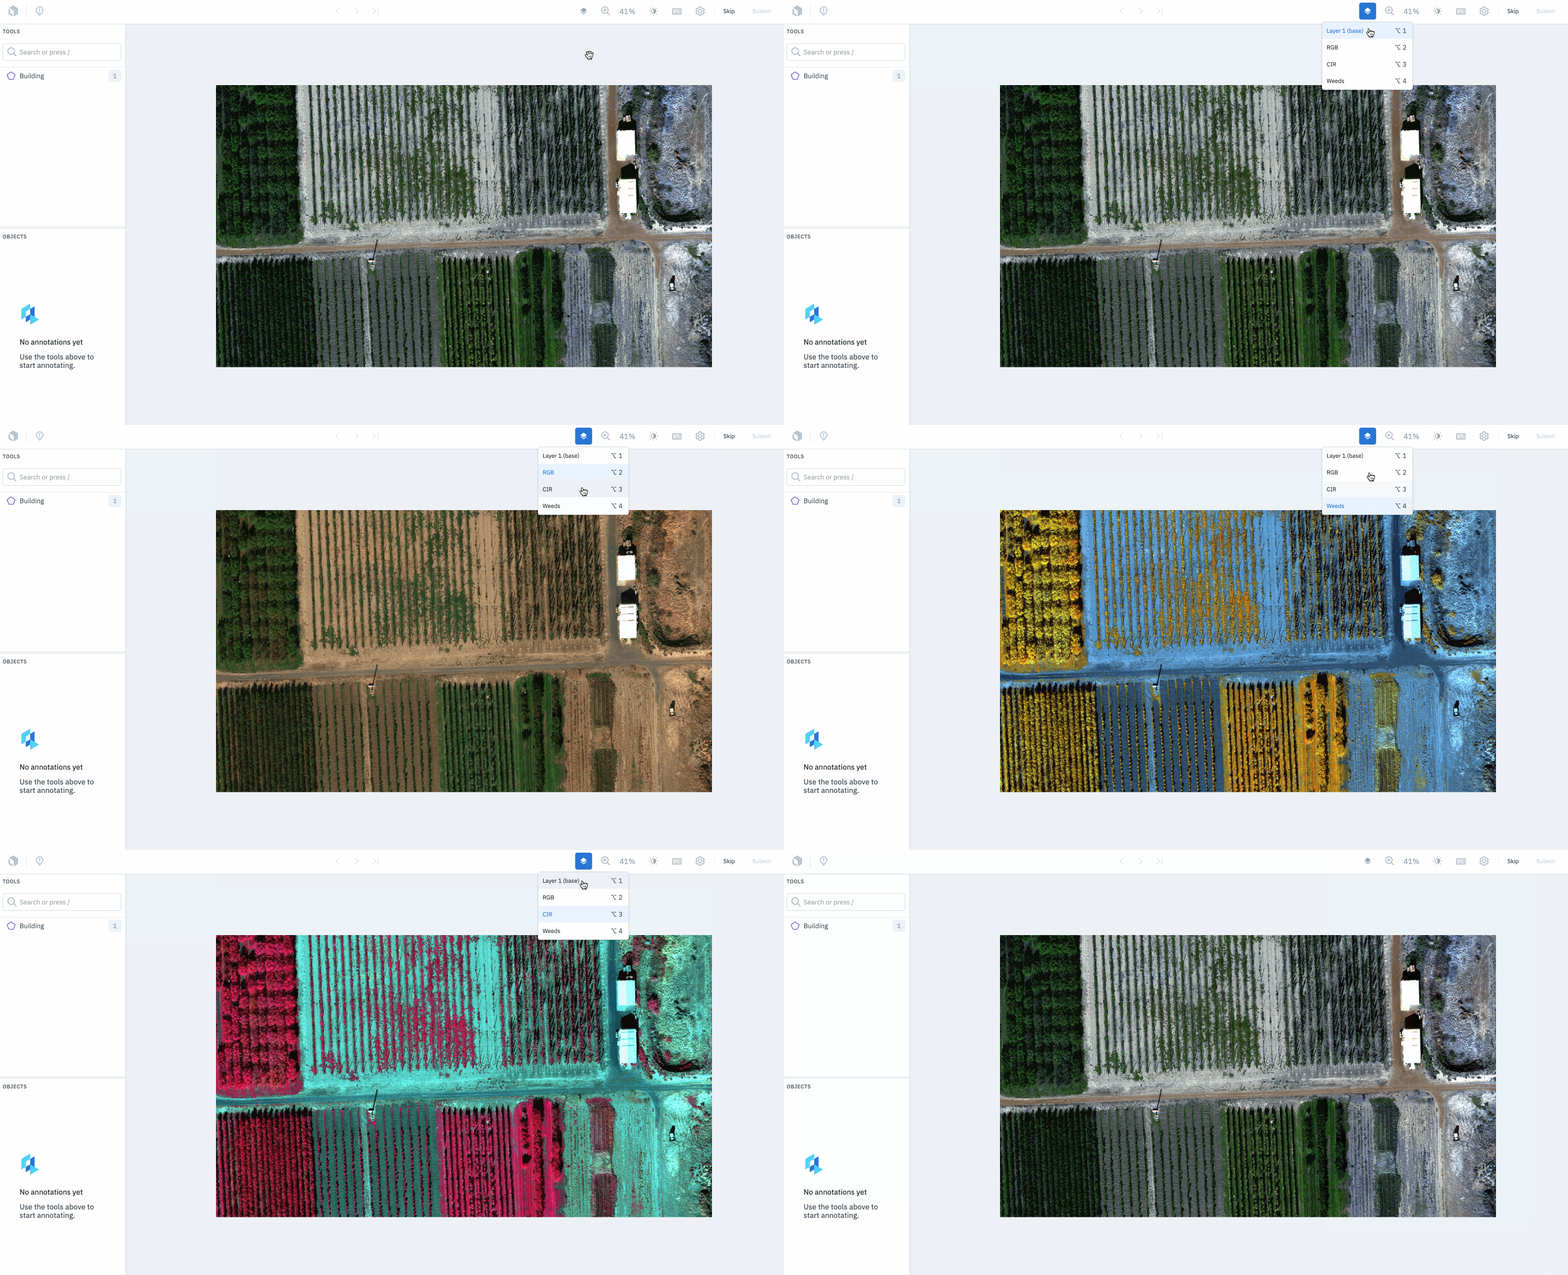 Layers are applied to individual images, and a maximum of 10 layers may be added per image. Image layers are a visualization tool designed to help you view the asset to be labeled in different ways. You may change visual settings on the image layers (e.g., transparency, brightness) and still create annotations on the data row.
To view the maximum number of images that can be attached as layers, visit our [limits](/docs/limits) page.
When layers have been provided for an image, you will see an **Image overlay** button appear in the top bar of the editor directly to the left of the zoom options.
Clicking on this button opens a dropdown menu where you can select an image to overlay. Alternatively, you can use the keyboard shortcut `Option`/`Alt` + `Layer #` to quickly switch between layers.
For details on how to create image layers or import data rows with image layers using the Python SDK, please view the documentation [here](https://docs.labelbox.com/docs/datasets-datarows).
## Auto-segment
This tool is embedded into the segmentation mask tool. To use auto-segment, select a segmentation mask tool, toggle on auto-segment by selecting the magic wand icon or using the hotkey `R`, and draw a box around an object.
Labelbox will automatically draw a segmentation mask on the object inside the box. Then, you can make edits, as usual, using the segmentation mask's pen tools. For more details, please view the documentation [here](/docs/image-editor#auto-segment).
## Bounding box tracking
This tool is embedded into the bounding box tool and is only available when labeling video assets. When you draw a bounding box around an object, click **Track Object** to activate bounding box tracking.
Labelbox will automatically track the object for a specified number of frames. Edit the results by selecting and removing any desired keyframes. For more details, please view the documentation [here](/docs/video-editor#ai-based-bounding-box-track).
## Supported annotations
The table below indicates which top-level annotation types you can use to label each asset type.
| Annotation type | [Image](/docs/image-editor) | [Video](/docs/video-editor) | [Text](/docs/text-editor) | [Audio](/docs/audio-editor) | [Documents](/docs/document-editor) | [Tiled imagery](/docs/tiled-editor) | [Conversational text](/docs/conversational-editor) | [HTML](/docs/html-editor) |
| --------------------- | --------------------------- | --------------------------------------------------- | ------------------------- | --------------------------- | ---------------------------------- | ----------------------------------- | -------------------------------------------------- | ------------------------- |
| **Segmentation mask** | | (use video segmentation tool) | N/A | N/A | - | - (Use polygon) | N/A | - |
| **Bounding box** | | | N/A | N/A | | | N/A | - |
| **Polygon** | | - | N/A | N/A | - | | N/A | - |
| **Point** | | | N/A | N/A | - | | N/A | - |
| **Polyline** | | | N/A | N/A | - | | N/A | - |
| **Entity** | N/A | N/A | | N/A | | N/A | | - |
| **Relationship** | | - | | N/A | | - | | - |
| **Radio** | | | | | | | | |
| **Checklist** | | | | | | | | |
| **Free-form text** | | | | | | | | |
Layers are applied to individual images, and a maximum of 10 layers may be added per image. Image layers are a visualization tool designed to help you view the asset to be labeled in different ways. You may change visual settings on the image layers (e.g., transparency, brightness) and still create annotations on the data row.
To view the maximum number of images that can be attached as layers, visit our [limits](/docs/limits) page.
When layers have been provided for an image, you will see an **Image overlay** button appear in the top bar of the editor directly to the left of the zoom options.
Clicking on this button opens a dropdown menu where you can select an image to overlay. Alternatively, you can use the keyboard shortcut `Option`/`Alt` + `Layer #` to quickly switch between layers.
For details on how to create image layers or import data rows with image layers using the Python SDK, please view the documentation [here](https://docs.labelbox.com/docs/datasets-datarows).
## Auto-segment
This tool is embedded into the segmentation mask tool. To use auto-segment, select a segmentation mask tool, toggle on auto-segment by selecting the magic wand icon or using the hotkey `R`, and draw a box around an object.
Labelbox will automatically draw a segmentation mask on the object inside the box. Then, you can make edits, as usual, using the segmentation mask's pen tools. For more details, please view the documentation [here](/docs/image-editor#auto-segment).
## Bounding box tracking
This tool is embedded into the bounding box tool and is only available when labeling video assets. When you draw a bounding box around an object, click **Track Object** to activate bounding box tracking.
Labelbox will automatically track the object for a specified number of frames. Edit the results by selecting and removing any desired keyframes. For more details, please view the documentation [here](/docs/video-editor#ai-based-bounding-box-track).
## Supported annotations
The table below indicates which top-level annotation types you can use to label each asset type.
| Annotation type | [Image](/docs/image-editor) | [Video](/docs/video-editor) | [Text](/docs/text-editor) | [Audio](/docs/audio-editor) | [Documents](/docs/document-editor) | [Tiled imagery](/docs/tiled-editor) | [Conversational text](/docs/conversational-editor) | [HTML](/docs/html-editor) |
| --------------------- | --------------------------- | --------------------------------------------------- | ------------------------- | --------------------------- | ---------------------------------- | ----------------------------------- | -------------------------------------------------- | ------------------------- |
| **Segmentation mask** | | (use video segmentation tool) | N/A | N/A | - | - (Use polygon) | N/A | - |
| **Bounding box** | | | N/A | N/A | | | N/A | - |
| **Polygon** | | - | N/A | N/A | - | | N/A | - |
| **Point** | | | N/A | N/A | - | | N/A | - |
| **Polyline** | | | N/A | N/A | - | | N/A | - |
| **Entity** | N/A | N/A | | N/A | | N/A | | - |
| **Relationship** | | - | | N/A | | - | | - |
| **Radio** | | | | | | | | |
| **Checklist** | | | | | | | | |
| **Free-form text** | | | | | | | | |