Images
Guide for labeling image data.
When you attach an image dataset to a project, Labelbox will automatically adjust the editor interface for image labeling.

Import image data
To learn how to import image data to Labelbox, visit our docs on importing images.
Data row size limit
To view the maximum size allowed for a data row, visit our limits page.
Supported annotation types
Below are the annotation types you may include in your ontology for labeling image data. Classification-type annotations can be applied globally or nested within an object-type annotation.
| Feature | Import annotation | Export annotation |
|---|---|---|
| Bounding box | See payload | See payload |
| Segmentation mask | See payload | See payload |
| Polygon | See payload | See payload |
| Polyline | See payload | See payload |
| Point | See payload | See payload |
| Relationship | See payload | See payload |
| Radio classification | See payload | See payload |
| Checklist classification | See payload | See payload |
| Free-form text classification | See payload | See payload |
Bounding box
Create a bounding box by starting at one corner and dragging your cursor to create the shape around an object in the image.
You can also click and drag to reposition the bounding box on the image.

Cuboid
Create a cuboid by starting at one corner and dragging your cursor to create a box shape around an object in the image. Once you release it, it will automatically become a cuboid.
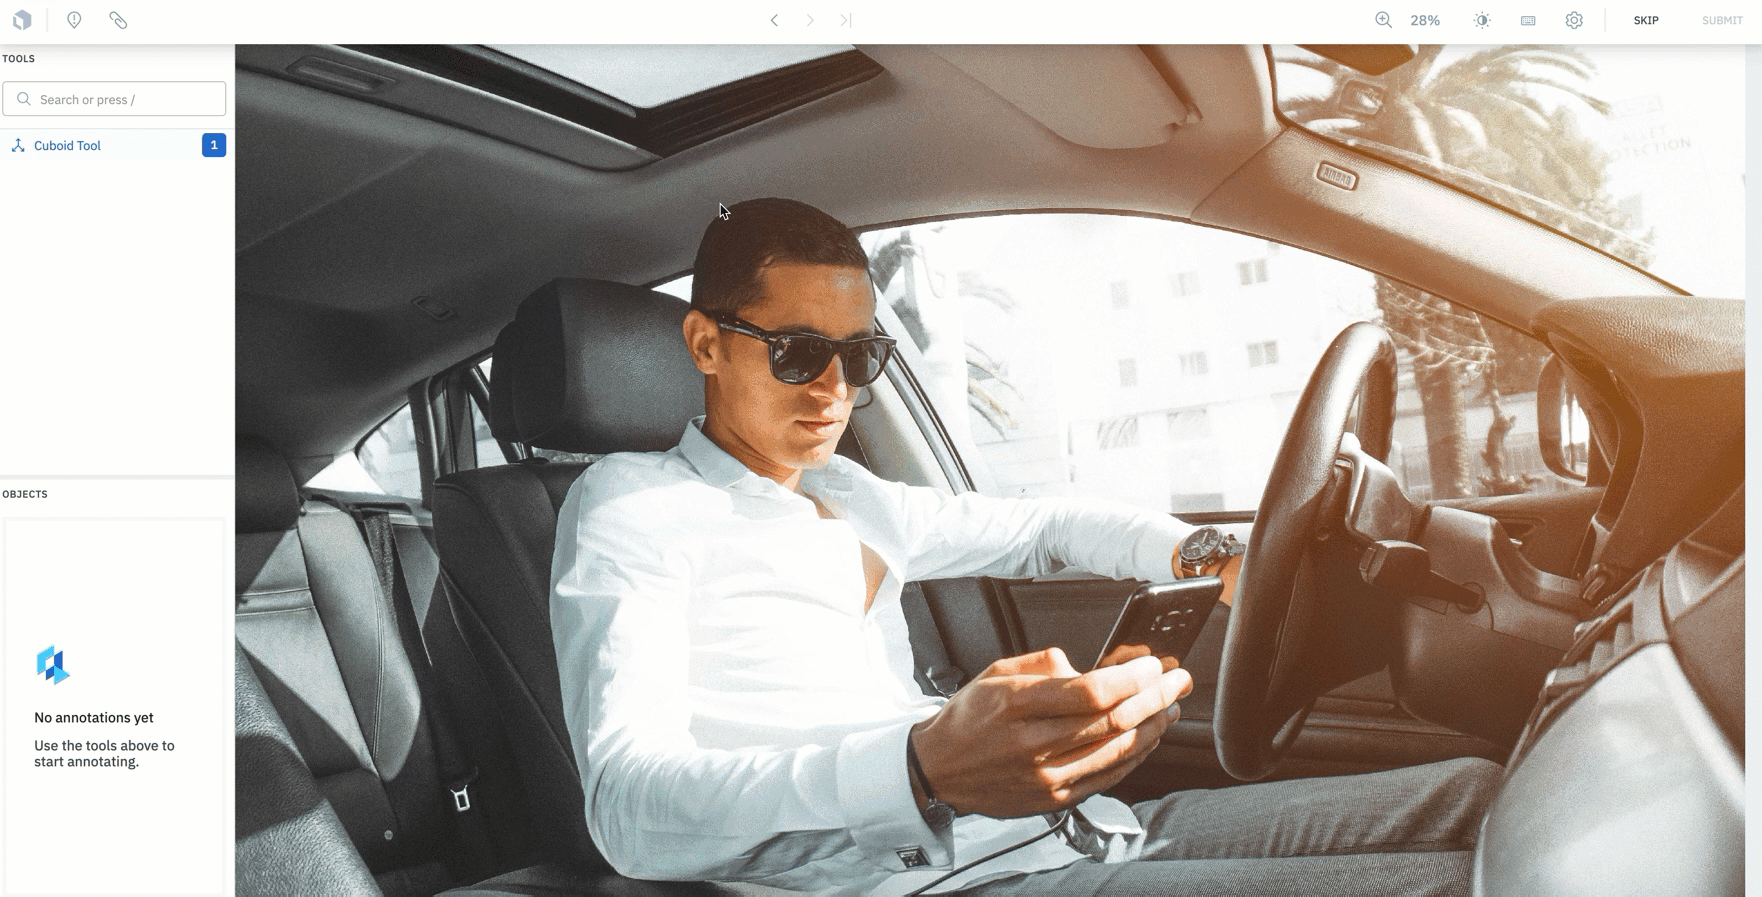
You can use the various levers on the tool to adjust its rotation along the x, y, and z axes. Along the center of the top bar, you will find buttons to switch to Rotate mode,Move mode, or Scale mode.
You can also directly input the rotation into the modal that appears in the ontology pane once the cuboid is initially drawn or selected for editing.
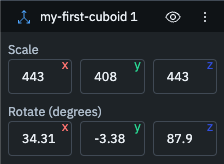
The fields available to edit are:
- Scale: This controls the cuboid size in each dimension. The unit is in pixels.
- Rotate: This controls the rotation of the cuboid along the three axes. For more details on the rotation, please refer to the diagram below.

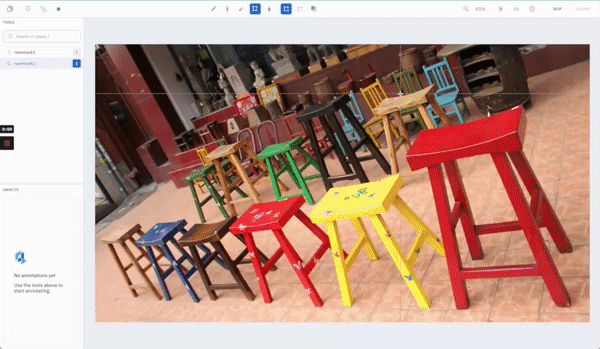
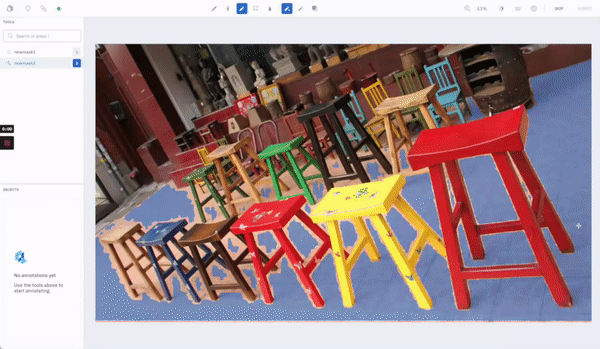
Segmentation mask
When you label an image with a segmentation mask, you have a handful of tools to help you create mask annotations more efficiently. (Note: Users of the former superpixel tool are recommended to use the new auto-segment tool.)
Empty mask error
If you receive an error message that reads, “The object is missing selected pixels. You should relabel or delete this object”, it means that the mask is considered empty.
By definition, a segmentation mask cannot have overlapping pixels. Thus, drawing a second mask fully within the first one creates an empty mask, resulting in this warning message.
AutoSegment 2.0 powered by Meta's SAM
AutoSegment 2.0 is available for all brand-new ontologies created after June 13, 2023.
Brand-new ontologies created after June 13, 2023, by default, use a new AutoSegment 2.0 tool powered by Meta's Segment Anything model.
You can use the AutoSegment 2.0 tool to generate mask predictions for individual objects in your image. The Auto
Segment 2.0 tool is designed for instance segmentation, meaning you can quickly label individual objects as it predicts one class at a time. Adjusting the contrast and brightness of the image does not affect the accuracy of the SAM model.
When a segmentation tool is selected, choose the AutoSegment option from the top navigation bar. There are two modes available:
- Box mode, which allows you to draw a box around an object to generate a mask on it.
- Hover and Click mode, which allows you to visualize masks as you move the cursor around, click to generate, and further modify by adding positive and negative points.
AutoSegment (Legacy)
This is the older version of AutoSegment released in 2022. It is available for ontologies created before June 13, 2023.
When a segmentation tool is selected, choose the AutoSegment option from the top navigation bar, and draw a box around the object you want to label. For best results, draw the boundary of the box close to the object edges. You can also adjust the brightness and contrast settings in the Adjustments menu in the top navigation bar to further improve results. Creating more contrast between the object you are labeling and its background will help the model detect the object more accurately.

Brush tool
The brush tool is available for all brand-new ontologies created after June 13, 2023.
Brand-new ontologies created after June 13, 2023, can access the brush tool. Use the brush tool to draw a freehand mask as though you are painting the canvas. You can choose from a circle or square-shaped brush, and adjust the size in pixels. Click the brush icon with the minus sign to use the eraser tool. It behaves similarly but removes mask pixels as you move the mouse.
Pen tool
Use the pen tool to outline the item in the image. Hold the cursor down to draw freehand or let the cursor go to draw straight lines between points. The pen tool is only available when creating segmentation annotations. Click the pen icon with the plus sign to use the pen tool.

Pen tool
Erase tool
You can use the erase tool to clean up the edges of a segmentation mask. Click the pen icon with the minus sign to use the erase tool.

Erase tool
Fill tool
You can use the fill tool to easily label backgrounds or, otherwise, assign a segmentation annotation to all other pixels in the image that have not already been labeled. The fill tool is only enabled for segmentation annotations.
Click the droplet icon to use the fill tool.

Polygon
Create a polygon annotation by clicking to create each point in the shape. Click the first point to close the polygon.

Polyline
Use the polyline tool to label lines in an image. Click on the last point to complete the shape.

Point
Use the point tool to label precise locations on the image.

Relationship
To create a relationship between annotations, select a relationship tool and hover over the annotation where you want the relationship to start to reveal the annotation's anchor points. Click an anchor point to create the starting point of the relationship, then bring your mouse over to the annotation you want to relate it to, hovering over it to reveal its anchor points. Finally, click one of the anchor points to complete the relationship.
Right-click a relationship to change its direction, make it bi-directional, or delete it from the asset.

Updated 23 days ago